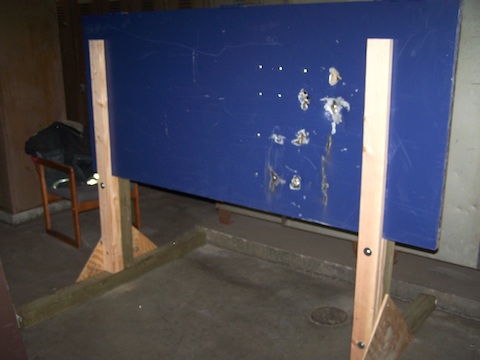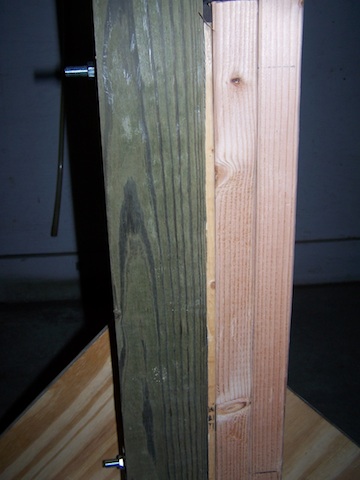
There are a number of different methods to defeat the carriage bolts that hold supplemental locks in place. The two most popular are cutting the head of the bolt with the rotary saw, or driving the bolt through the door with a halligan. Lt Christopher Parker from City of New Haven (CT) Squad Co 1 sent in this idea for a simple prop to practice either technique. The prop is a simple stand that “clamps†a scrap metal door in place horizontally to allow for a large surface to mount carriage bolts. Once the door is consumed the carriage bolts are loosened to allow the door to be removed and another slid in its place. The stands are only 5 feet tall and 5 feet wide and don’t take up much room when stored. The legs are 5ft 4×4’s with heavy-duty brackets to secure the uprights. The uprights are made from 5ft 4×4’s on one side and 5ft 2×4’s on the other. The bottom “shelf†of the uprights are 3ft 2×4’s with an additional scrap of 2×4 cut into ¼†thickness (see photo below.) The ¼ scrap is simply to make up the difference of the thickness of the door. A piece of ¼†plywood would work just as well and may even be easier to work with. Once the door is clamped in place, simply drill holes and place the sacrificial carriage bolts in place. Wing nuts can be used to prevent the need for any additional tools when clamping the door or adding the carriage bolts. Notice in the first picture that the prop is up against a curb to limit movement (sliding) during use, placing the prop against a building would work the same. This easy to assemble prop can provide some great forcible entry training on a technique that may not often be practiced.

Here is the detailed parts list that can be obtained for well under $100:
(2) 10 foot PT 4x4s
(2) 8 foot 2x4s (plus a 2ft scrap),
(2) 8 inch carriage bolts
(2) 8 inch lag bolts
(4) heavy duty 90 deg brackets
(1) 2×2 sheet of plywood
3 inch deck screws

Gald.
The silence was KILLING ME!!!!!!!!!!!!!!
I hear that!..err….No I don’t!
Cuz I’m board (haha get it?) and to prevent the device from moving, I wood (sorry) suggest bolting or screwing a sheet of plywood onto the bottom of the prop.
The ‘students’ own weight would then help keep the prop in place.
http://i39.photobucket.com/albums/e193/funepics/doorstand1.jpg
When we were making this set-up, we thought about using the plywood, but opted to not go that route. The idea was to create this stand so that it would be easy to store when not in use.
I was also planning on adding a spot on the door to install lock cylinders to practice removal techniques, and eye bolts to the 4x4s to set up a padlock cut station.
Slightly more involved than the plywood underneath method:
Yes you’ve heard of it, now you can read about it!
😉
Wait for it…..the plywood on top design!
If both the prevention of movement and portabilty were an issue I would suggest fitting a piece of plywood (notched for the verticle members and strapped underneath with 2x4s on edge). The plywood could sit on top of the legs (feet) with the 2x4s on the bottom cut back the appropriate distance. This surface could then be dropped in or lifted out of position for storage.
Just make sure that the 2x4s that run underneath the plywood (to stop the sheet of ply from turning into a hammock) are cut short to allow for the 4x4s.
Maybe even cut some holes (somewhere) so that you can get your hands in there to lift it out.
http://i39.photobucket.com/albums/e193/funepics/doorstand3.jpg
We don’t have any horizontal doors in our district.
It’s 2012. Just wait until the Apocalypse. They’ll all be horizontal. Just think of the advantage you’ll have then!